
Numbering schemes in Autodesk Vault are essential for organizing part files, assemblies, and documents with consistent naming conventions. Whether you’re using Vault Basic, Workgroup, or Professional, setting up an effective numbering scheme improves data standardization, reduces inconsistencies, and enhances searchability across your vault server. In this guide, based on KETIV’s “Mastering Autodesk Vault” series, we walk you through how to create and implement both smart and auto-generated numbering schemes.

Why numbering schemes in Autodesk Vault are important
Numbering schemes in Autodesk Vault are more than just a way to assign part numbers; they form the foundation of a consistent, searchable, and scalable data management system. Without a standardized approach, teams risk introducing file name inconsistencies, duplicate item numbers, and confusion during design revisions or reuse.
Here’s why having a proper numbering scheme matters:
- Improved Data Consistency: Smart or auto-generated numbers prevent duplicate entries and reduce errors across Vault folders and assemblies.
- Faster Search and Retrieval: When part numbers follow predictable patterns, users can find components and documents quickly using filters or Vault’s search features.
- Enhanced Collaboration: A shared naming convention improves communication across departments, especially when working with shared design data or Vault Workgroup setups.
- Scalable Structure for Growth: As product lines, teams, or regions expand, having a clear namespace and naming structure allows for smooth onboarding and system expansion.
- Support for Automation and API Integration: Proper numbering schemes support features like the Vault Job Processor, Vault Copy Design, and Vault API, enabling automation and advanced workflows.
By implementing a well-planned numbering scheme, you create a strong backbone for all document and item master management in Vault, one that enables traceability, improves version control, and ultimately supports smoother manufacturing operations.
Step-by-step process to configure part numbering schemes
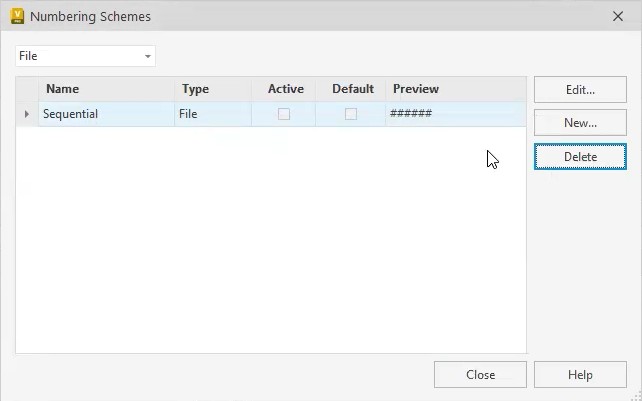
Step 1: Access numbering scheme settings
- Open Vault Client
- Navigate to: Tools > Administration > Vault Settings > Behaviors Tab > Numbering > Define
- Delete any old or unused numbering schemes (if desired) to start fresh
This sets up your workspace for either smart part numbers or automated sequences.
Step 2: Decide between smart vs. dumb numbers
Vault supports two types of numbering schemes:
- Smart Numbers – Include descriptive prefixes (e.g., ASM-001 for assemblies)
- Dumb Numbers – Auto-generated sequential IDs (e.g., 00001, 00002)
Step 3: Create a basic auto numbering scheme
- Click New in the Numbering window
- Name the scheme (e.g., CAD)
- Add a numeric field with a fixed length (e.g., 5 digits)
- Click OK
💡 Note: Once a numbering scheme is used, key settings like length cannot be edited. Plan ahead.

Step 4: Test the auto numbering in Inventor or AutoCAD
- Open Inventor or AutoCAD
- Create a new file
- On first save, Vault will auto-assign a number based on your scheme
- Once used, the number is “burned,” even if you don’t check in the file
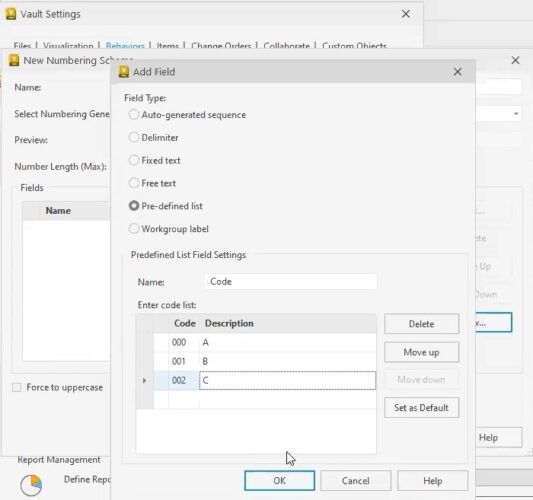
Step 5: Create a smart numbering scheme with prefixes
To define smart numbers:
- Use predefined dropdown lists
- Assign meaning to each prefix (e.g., ASM = Assembly, PRT = Part)
- Combine elements like text codes, delimiters (e.g., dashes), and auto-numbers
Preview the resulting format in real time to verify its structure.
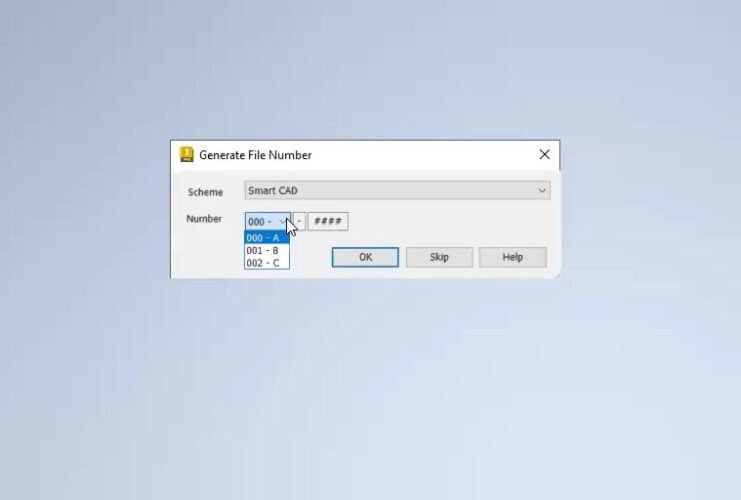
Step 6: Select numbering scheme when saving
When multiple schemes exist:
- On file save, select which numbering scheme to use
- Smart numbers show both code and description to help users select the right format
Manage scheme growth & limitations
- Once used, numbering schemes cannot be edited
- Recommended: create separate schemes for each prefix or product category
- This makes it easier to expand or revise your strategy later
- Use descriptive scheme names (e.g., Assembly-ASM, Component-CMP) to keep Vault folders organized
Avoid duplicate file names in Vault
- Enable unique file name enforcement in Vault settings
- This prevents accidental file duplication and improves Vault copy design workflows
- Ensures better traceability and audit trail for reused components
Best practices for numbering schemes in Vault
- Pre-plan your namespace
- Match scheme names to property values or part metadata
- Decide how you’ll track design changes across item masters
- Determine whether users need flexible schemes or strict data standard rules
Conclusions
Designing an effective numbering scheme in Autodesk Vault requires upfront planning but pays off in long-term data integrity and efficiency. Whether you’re working with Vault Professional, Basic, or Workgroup, defining clear part identifiers ensures your team can easily locate, track, and reuse content, especially when paired with Vault features like the Job Processor, Vault API, and Copy Design.