
File categories in Autodesk Vault are customizable labels you assign to files, such as CAD drawings, documents, or images. Each category can be configured to automatically assign important properties, like lifecycle definitions, revision schemes, and user-defined properties, as soon as a file is added to the Vault server.
By properly configuring file categories, you streamline data entry, improve version control, and ensure that every file inherits the correct default settings for your organization’s workflow.
Efficient data management is critical for any engineering, manufacturing, or design team. In Autodesk Vault, organizing your files and automating important settings begins with setting up file categories. In this guide, you’ll learn how to configure file categories in Vault, including best practices for automating lifecycles, revision schemes, and metadata assignments. These steps are relevant for users of both Vault Professional and Autodesk Vault Basic.
What are file categories in Autodesk Vault?
Why configure file categories?
- Automation: File categories auto-assign lifecycles, revision schemes, and properties, saving engineers time and reducing manual errors.
- Standardization: Ensure every file, from Inventor models to XML files, is governed by the right rules.
- Search & Filter: Easily filter and find files by category using Vault’s client software or integrations with tools like Windows Explorer and browser extensions.
- Security & Compliance: Apply category-specific permissions for read access and control, specifying which user profiles or groups have access to sensitive files.
Step-by-step: How to configure file categories in Vault
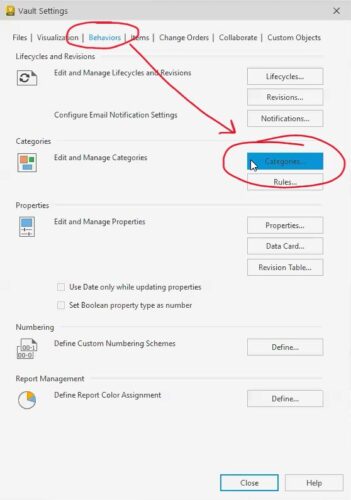
1. Access Vault settings
- Log in to your Vault client as an administrator.
- Navigate to Tools > Administration > Vault Settings.
2. Open the Behaviors tab
- Click on the Behaviors tab.
- Select Categories from the left-hand menu.
3. Choose File Category Configuration
- Make sure the dropdown is set to File Categories.
- Here you’ll see a list of all existing file categories, such as “Engineering,” “Office,” or the default category.
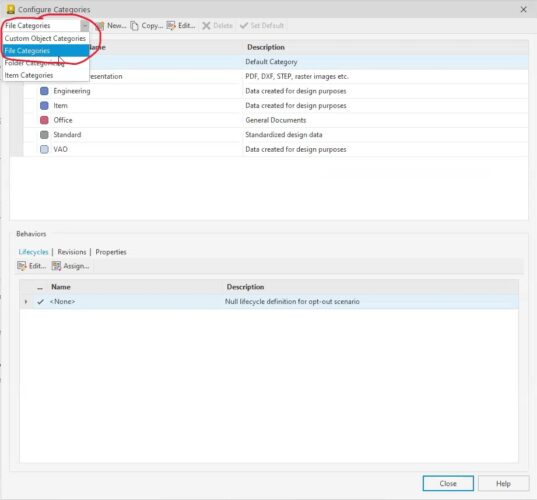
4. Create or Edit a File Category
- To add a new category: Click New and enter a descriptive name (e.g., Engineering, Office Documents).
- To edit: Select a category and adjust its properties as needed.
You can customize:
- Color and icon for easy identification
- Lifecycle Definitions: Assign a default lifecycle (e.g., “Work in Progress → Released”) that will apply to all files in this category.
- Revision Schemes: Choose how revisions are tracked, alphabetically, numerically, or custom.
- User-defined properties: Attach key metadata fields (such as file name, alias, keyword, or encryption key requirements) to all files in the category.
5. Set Up Assignment Rules
Assignment rules automate the categorization process:
- Click the Rules button in the Behaviors tab in the Vault Settings Window.
- Add a file rule. For example, assign all Inventor files to “Engineering” by checking if the provider property contains “Inventor.”
- Use file extensions or system properties to set rules for other file types, like XML files, JPEG images, or documents.
Rules are evaluated from the top down, so order matters; be specific with file extensions or provider keywords to avoid miscategorization.

6. Test and Apply Rules
After setting up or editing rules:
- Test by importing or checking in multiple files.
- Confirm that the correct category, lifecycle, and revision scheme are automatically assigned.
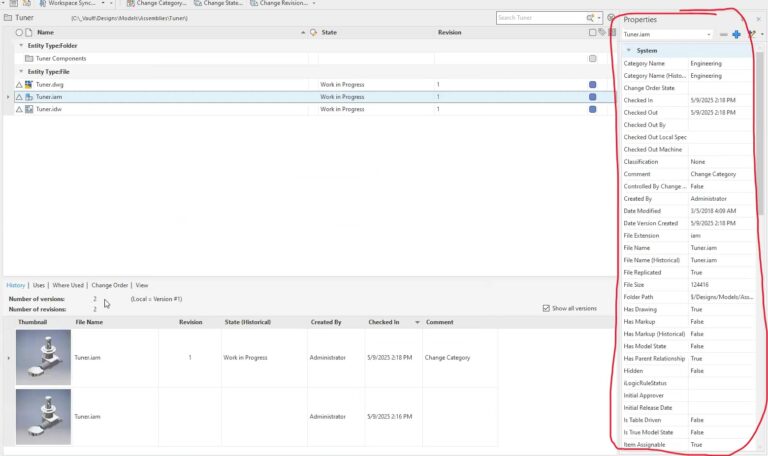
- For existing files, you can manually apply assignment rules and change categories if needed.
- Tip: When updating categories for large datasets, ensure “include dependents” is checked to update all related files.
7. Review and Adjust Metadata
Some files, such as office documents or images, may not need revision control or full metadata.
- For these categories, set lifecycle and revision scheme to “None.”
- Remove unneeded user-defined properties for a clean, efficient dataset.
8. Avoid Common Pitfalls
- Hidden Files: Use the “Show Hidden Files” option to confirm visualization files (like DWF or PDF) do not inherit engineering file categories or unnecessary lifecycle states.
- Overlapping Rules: Make sure that only intended file types match each rule, and always validate changes with a test check-in.
Using Item Categories and Folder Categories
Vault also supports item categories (for assemblies, BOMs, or items with material information) and folder categories. The configuration process is similar, assign lifecycle, revision, and property settings as appropriate. This further streamlines large projects managed with Vault Professional.
Conclusion
Learning how to configure file categories in Vault is essential for any team using Autodesk Vault Professional or Vault Basic. Properly configured file categories automate routine work, ensure compliance, and reduce data management headaches. By leveraging rules, default values, and category-specific settings, you set your Vault server up for efficient, secure, and scalable project management.
Need expert help with Autodesk Vault or advanced configuration? Contact KETIV for more information!