
In this Ansys Virtual Academy, a monthly on-going webinar series on all things simulation, we walked viewers through the guided meshing workflow for watertight geometry in this training course. Ansys Fluent is the world’s most powerful, widely known, general- CFD software.
The training course followed the easy and intuitive steps in the guided workflow to auto-generate a high quality CFD mesh in Fluent meshing. This was followed by a surface measuring demo using the guided workflow. In this blog, I will be highlighting some of the concepts covered in the session. Don’t forget to take a look at the recent AVA for a deeper dive and keep reading to learn more!
Benefits of Fluent Meshing
Ansys Fluent meshing is a powerful tool, which can be used to achieve high-quality and accurate measures for your 3D geometries. Let’s take a minute to elaborate on some of the capabilities and features that you stand to gain when using Fluent meshing.
Single-Window Workflow
Fluent meshing allows you to have a single-window workflow in which you can go from CAD import right up to post-processing. You have your CAD prepped for simulation, you import it into the fluent interface, you surface measure, volume measure and set it up for simulation, solve it and then do post-processing without having to step outside the Fluent environment. This makes it really convenient, especially for new users.
Task-Based Workflow
Next, in the recent versions of Ansys Fluent we aim for something called a task-based workflow. If you are not an Ansys CFD simulation software expert or a meshing expert, you will want to reduce the burden on the end-user to come up with manual meshes that need to be optimized in terms of cell count and also quality. Fluent has guided workflows that take you through the step-by-step process of setting up these meshes so anyone can start off with Ansys CFD simulation meshing without being an expert.
For the purposes of this blog, we will focus on the watertight geometry meshing workflow in Ansys Fluent. This is useful for clean CADs or clean geometries that have already been prepped in another software, such as Ansys SpaceClaim. For more information on this, take a look at the recent AVA, Using Ansys SpaceClaim Direct Modeler for FEA Geometry Preparation (https://youtu.be/lefLSCMEhvQ).
Fault Tolerant Meshing Workflow
What if your geometry is not clean? Your geometry may be complex, with many components that you do not want to manually go in fix, Fluent has an option for that as well. Fluent offers you a wrapper-based workflow for meshing dirty CAD called a Fault Tolerant Meshing Workflow.
Parallel Processing
Also available is the capability of parallel processing for faster mesh generation. If you are handling big, flawed geometries where you expect a high cell count, then using multiple cores is a great option. You will be able to distribute the meshing processes over these cores and reduce your meshing time.
Mosaic Measuring Technology
The mosaic measuring technology can be used for optimal meshing to generate high-quality fast meshes with the optimal number of cells in different regions. It lets you transition from different types of elements in different sections of your computational domain by using transition layers of polyhedral cells.
Mosaic meshing technology lets you combine these hexahedral elements in the interior of your computational domain with poly Prizm boundary layers near the wall region with the help of a transition layer. You get the best accuracy in the least amount of time.
Steps in Watertight Geometry Workflow
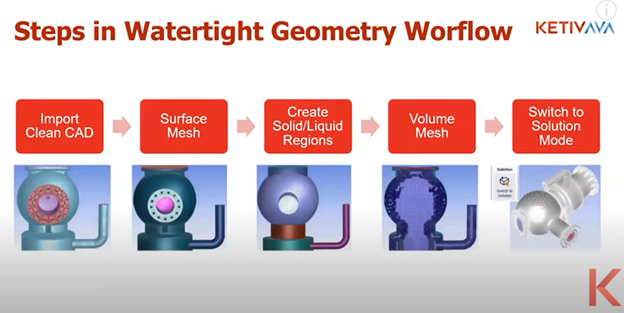
First, import your clean CAD, meaning it shouldn’t have any leaks or holes. It should be a closed computational domain in Ansys Fluent meshing.
Next, generate the surface mesh by assigning local sizes and generate the solid and liquid regions. Now these solid and liquid regions can be generated in the CAD tool itself. You can create it through SpaceClaim or inside Fluent itself.
Finally, generate the volume mesh. Once done, you can switch to Solution Mode.
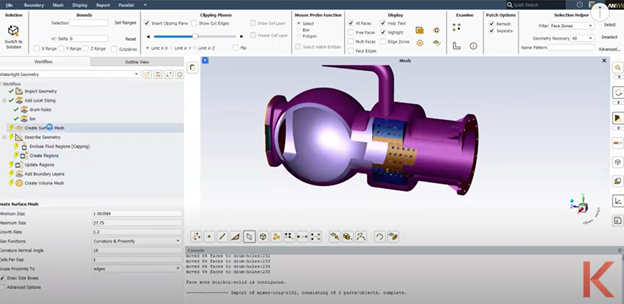
Demo for Watertight Geometry Workflow
Take this static mixer as an example.
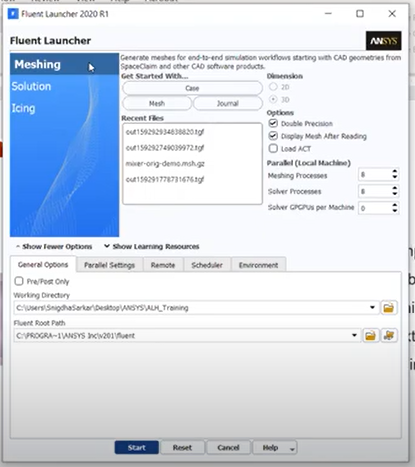
Let’s start by launching the meshing mode through the Fluent Launcher 2020 R1, the latest version of Fluent.
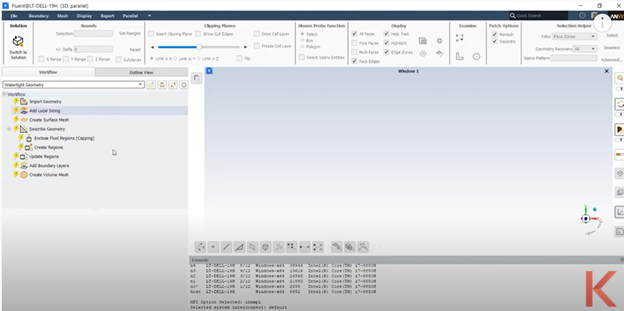
As soon as I select watertight geometry, I have these top to bottom tasks outlined. Start by importing the geometry where they have a lot of different CADs. It will ask for the units, giving you the option to select a different unit based on the mesh that you are working with or based on the geometric dimensions of your CAD.
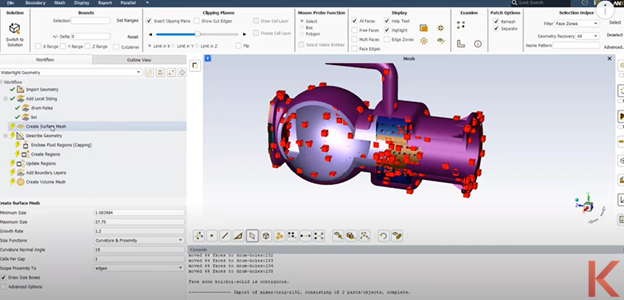
After successfully importing the geometry, we will move on to adding the local sizing. You only need to go through this step if there are faces or areas where your mesh needs to be finer, or you need to capture more gradients. Once done, you will see the green check next to it.
Next, add local sizing to this blue region, which we call body of influence. Body of influence is any region in your computational domain that is not actually participating in your simulation.
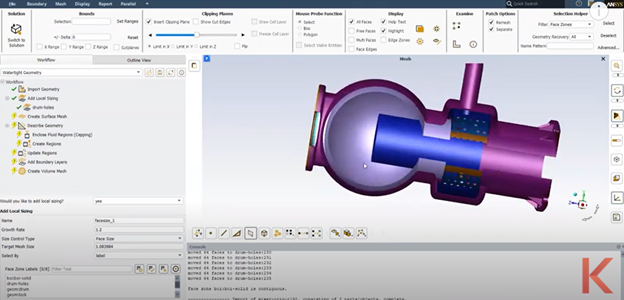
You will not get boundary layers at these boundaries; this is just for including refinement. I’m going to create another local sizing for this body of influence. This is where I tell Fluent that this is a region of refinement but not actually a part of the geometry. As soon as it is done, the green checkmark appears, and the blue region vanishes.
Move on to creating surface mesh. These are the global size controls applied by defaults.
The cells per gap tell you how many element layers you want. Next, it asks to describe the geometry because all we have in our domains are solid regions. We just have clean solid geometry without any leaks or holes. Now we have to enclose the fluid regions.
Finally, we are going to create the volume mesh. Select the poly hex core option and have the parallel meshing option checked. Now this is what the mosaic measuring is.
What are the advantages of using a polyhedral mesh?
First, if you look at the elements, they can get highly skewed because they have to conform to these different curvature surfaces and complex geometries. That can result to poor quality meshes.
Secondly, polyhedral cells have more faces than a tetrahedral element. If you have a given computational section, you’ll essentially need a fewer number of polyhedral cells to mesh the same region as compared to tetrahedral cells. It does eventually reduce the solve time.
In conclusion
Ansys meshing is a powerful meshing tool for generating easier, faster, and more high-quality meshes with the help of Ansys Fluent watertight workflow. Mosaic meshing technology allows disparate elements to be connected using polyhedral cells allowing for high-quality optimal meshing in each region. Moreover, watertight geometry guided workflow in Ansys Fluent reduces meshing efforts, and is easy to use, like Ansys Scade or Ansys Workbench.